Localising the Unity Project

Localising your text in Unity once the previous steps are done, is even easier than the last post.

Where ever you have text to localise, simply replace:


 //C#
public GUIText myText;
myText.text = "This is my text to localise";

//UnityScript
var myText : GUIText;
myText.text = "This is my text to localise";

with……


public String textID;
public String defaultText;
myText.text = EtceteraBinding.getLocalizedString( textID, defaultText );

Where…

  • textID is the stringID that you have in Column B of your Data Entry tab in the Localisation Register
  • defaultText is the text that should appear should your string reference not work – makes it easy for you to see during QAing. e.g. put in here “NOSTRING” as an example.

And that’s it!

We have made a little script that we literally throw onto any GUIText instances in the scene for quick localisation. It exposes the above textID and defaultText, so that’s all we need to enter in the Inspector once it’s attached:

UnityScript Version

#pragma strict

var textLabel : String;
var defaultText : String;
var thisObject : GUIText;

function Start () {
	LocaliseStrings();
}

function OnEnable () {
	LocaliseStrings();
}

function LocaliseStrings()
{
	thisObject.text = EtceteraBinding.getLocalizedString( textLabel, defaultText );
}

C# Version

using UnityEngine;
using System.Collections;

public class LocaliseMe : MonoBehaviour {

	public string textLabel;
	public string defaultText;
	public GUIText thisObject;

	void Start()
	{
		LocaliseStrings();
	}

	void OnEnable()
	{
		LocaliseStrings();
	}

	void LocaliseStrings()
	{
		thisObject.text = EtceteraBinding.getLocalizedString( textLabel, defaultText );
	}
}

When you’ve added strings for all text, simply make an APPEND BUILD (Command/Control B) and your App is localised.
You can also “localise” images, as well, by using getCurrentLanguage(); to grab the language and load an image accordingly.

So that’s all there is folks! Localisation is so easy when you have the right tools.

In the word’s of Google Translate, “Viel Glück!”
From Localisation Register to Xcode

Now that the .strings files for each language are in Xcode, we can start moving our strings from the Localisation Register into them.

This process is simple — very simple. In fact, I don’t know why we have an entire post dedicated to it.

  1. In the Localisation Register, select the entire COLUMN from your EXPORT tab
  2. Copy (Command/Control C).
  3. Navigate to the corresponding .string file in Xcode. e.g. Localizable.strings (English)
  4. Make sure you click inside the file’s Editor screen
  5. Paste (Command/Control V)
  6. Save (Command/Control S)
  7. Repeat steps 1 to 6  for each language

That’s it.

Now, I’m sure there’s a clever person out there who could automate this process somehow. But how can it be easier than copying and pasting?!

Time to head back to Unity for Localising the Unity Project

Setting Up Xcode for Localisation

Now we move on to getting Xcode set up ready to read your localised strings from Unity.

Build your project from Unity so that you have latest. When Xcode has finished its build process, follow these steps to set up your build for localisation. Follow each step and see how easy it is!

Step 1

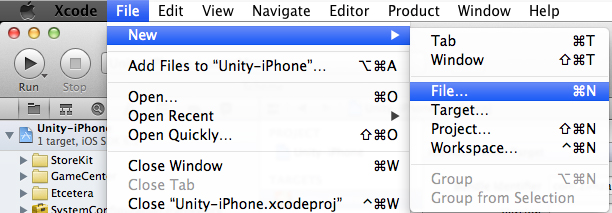
With your Unity Project selected, create a new File

Create a New File

Step 2

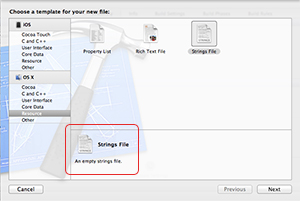
Select String type file…

Select String File Type

Step 3

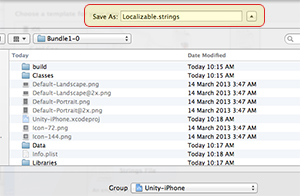
Name your file “Localizable.strings”. You MUST use this file name exactly as written.

Name File Localizable.strings

Step 4

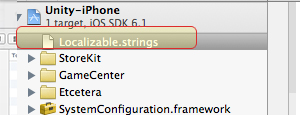
Press Save and notice that it now appears here…

Save It

Step 5

Now look to the right of the Xcode Screen. You should see this button…

5_LocaliseIt

With the Localizable.strings file still selected as in Step 4, Press “Localize” now.

Step 6

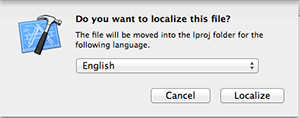
Select the main language you are localising to, in this case, English…

5b_ConfirmLocalise

..and press the Localize button.

Step 7

Now where the “Localize” button once appeared from Step 4, the following now displays…

6_TickLanguages

Tick the boxes you wish to localise to. Don’t worry if a language isn’t listed… that’s coming up soon.

Step 8

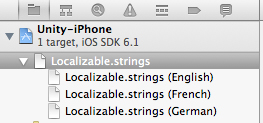
If you look back to your original Localizable.strings file, you’ll now see that the other languages’ .string files have been created as children of the original file.

(NB: “English” = US English)

6b_LanguageFilesCreated

You can now go ahead and insert additional languages, by following these next steps.

Step 9

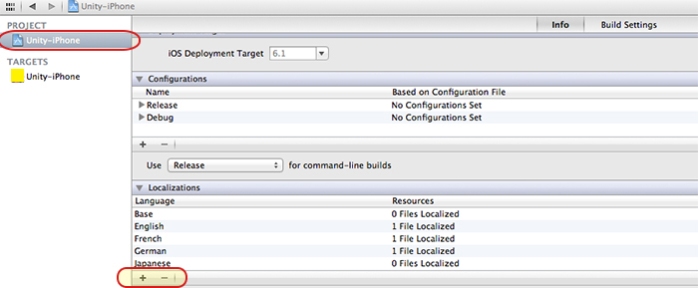
Make sure you have the project selected…

Add More Languages

Step 10

Navigate to the “INFO” tab of the project. You’ll see a “Localizations” section per below.

Add More Languages

Click on the “+” sign to add other languages. A drop down list of all available languages are shown. When you click on one, it will be added to the list in the “Resources” column.

To remove a language, simply press the “-” sign.

Step 11

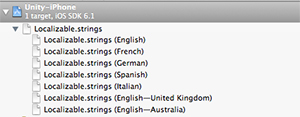
Once step 10 is complete, you’ll notice that the languages you added have now had .strings files created for them.

Add More Languages

And that’s it! How easy is that?!

Now we can add our strings created in our Localisation Register. So let’s move on to From Localisation Register to Xcode.